I. Introduction
A. Importance of Proper Door Fitting
Properly fitting doors are essential for both functionality and aesthetics within a space. A door that doesn’t fit correctly can lead to drafts, uneven closing, and potential damage over time. Whether you’re installing a new door or replacing an old one, ensuring a precise fit is crucial for a seamless and long-lasting result.
B. Overview of Door Trimming Process
Trimming a door involves carefully adjusting its size to fit the door frame perfectly. This process requires precision and attention to detail to achieve optimal results. By following the correct steps and using the right tools, you can tailor the door to the exact dimensions needed for your space.
C. Tools and Materials Needed
To trim a door effectively, you’ll need a few essential tools and materials, including a measuring tape, pencil, saw (either hand saw or power saw), sandpaper, and safety equipment such as goggles and gloves. Additionally, having shims and a level on hand can help ensure proper alignment during installation.
II. Measuring and Marking
A. Assessing the Fit
1. Identifying Areas of Interference
Begin by inspecting the door’s fit within the frame. Note any areas where the door rubs or sticks against the frame when opening or closing. These points of interference will indicate where material needs to be removed.
2. Understanding Tolerances
Keep in mind that doors need a small clearance around the edges to accommodate movement and prevent binding. Typically, a gap of around 1/8 to 1/4 inch is sufficient for proper operation.
B. Measuring for Trimming
1. Height and Width Measurements
Measure the height and width of the door opening to determine how much material needs to be removed. Make precise markings on the door surface, indicating where cuts will be made.
2. Marking Guidelines
Use a straightedge or level to create clear guidelines for cutting. Double-check measurements and markings to ensure accuracy before proceeding to the cutting stage.
III. Cutting and Shaping
A. Choosing the Right Tools
1. Hand Saw vs. Power Tools
Decide whether to use a hand saw or power saw based on your comfort level and the complexity of the trimming job. Hand saws offer more control for intricate cuts, while power tools can speed up the process for larger doors.
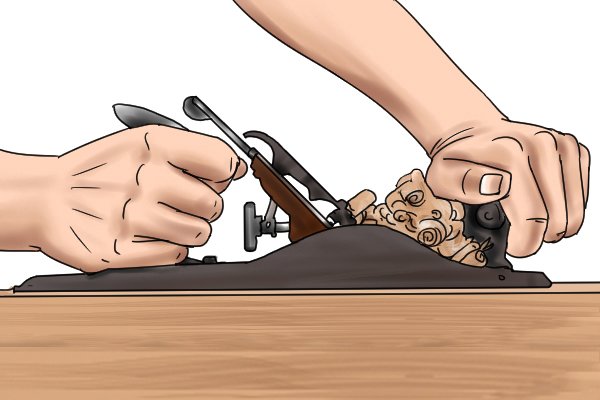
2. Specialty Tools for Precision
For more intricate cuts or shaping, consider using specialty tools such as a plane or rasp. These tools allow for finer adjustments and can help achieve a smoother finish.
B. Cutting Techniques
1. Straight Cuts vs. Angled Cuts
Depending on the door’s alignment and the frame’s shape, you may need to make straight cuts or angled cuts to achieve the desired fit. Follow the guidelines carefully to ensure accuracy.
2. Removing Material Gradually
It’s best to remove material gradually, checking the fit frequently as you progress. This incremental approach helps prevent over-cutting and ensures a precise fit.
IV. Finishing and Sanding
A. Smoothing Rough Edges
1. Sandpaper Grit Selection
Choose the appropriate grit of sandpaper to smooth rough edges and surfaces. Start with a coarse grit to remove excess material, then gradually move to finer grits for a smoother finish.
2. Addressing Splinters and Burrs
Inspect the door’s edges for any splinters or burrs leftover from cutting. Use sandpaper or a file to gently remove these imperfections, ensuring a clean and safe surface.
B. Ensuring Even Surfaces
1. Checking for Consistency
After trimming, check the door’s surfaces for consistency and uniformity. Any uneven areas can be corrected with additional sanding or shaping as needed.
2. Fine-Tuning the Fit
Continue to fine-tune the fit by testing the door’s movement within the frame. Make any necessary adjustments to ensure smooth opening and closing without any sticking or binding.
V. Installing Hardware and Final Checks
A. Reattaching Hinges and Handles
1. Aligning Hardware with New Dimensions
Once the door is trimmed to the correct size, reattach hinges and handles according to the new dimensions. Ensure that all hardware is aligned properly for smooth operation.
2. Testing Movement and Functionality
Test the door’s movement and functionality by opening and closing it multiple times. Make any final adjustments to hinges or hardware as needed to ensure proper alignment and operation.
B. Checking for Proper Clearance
1. Ensuring Smooth Opening and Closing
Verify that the door opens and closes smoothly without any resistance or obstruction. Check for proper clearance around all edges to prevent binding.